- All Categories
- Fitting Instructions for Roller Blinds
- Fitting Instructions for Day & Night Blinds
- Measuring full height wood shutters
- How to measure fit
The Basics – things you need to know when starting:
A. For accuracy and best results always try and use a metal tape measure
B. Be ready to write the measurements down immediately by having a pen/pencil and paper to hand.
C. Label each window for clarity (e.g. kitchen, bedroom, office, board room etc)
Inner or Outer Recess?
There are 2 window blind fitting options available to you depending on your requirements.
1. Inner Recess – This is s where the blinds hang inside the window recess or frame.
2. Outer Recess – T This is s where the blinds hang outside the window recess or frame.
How to measure for an inner recess fitting:
1. Ensure the window recess you want your blind to go into is not obstructed in anyway by window handles, locks, wall tiles etc. The blind should be able to hang freely.
2. We advise measuring the width from A to B in several places (e.g. measure above, below and across line A to B) – this should allow for any variations. Write down the SHORTEST measurement in MM or CM.
3. Measure the length (also known as DROP) – again measure in several places and write down the shortest
4. We will make your blind to your exact measurement

Top Tips – things you should know when measuring for inner recess:
- For roller blinds please note that the actual fabric will be approximately 3-4cm (30mm-40mm) narrower than the recess width depending on the blind ordered. This is to allow for any control component on the side of the blind. We will always take the provided width and manufacture this as the full blind width (not fabric width)
- Check that your recess is deep enough to fit the blind into
- Make sure you take into account any obstructions on the window that would make it difficult to install or operate of the blind, such as window handles, security bars, wall tiles etc
- If you’re ordering black out fabric, we recommend you use an outer recess fitting to ensure the entire window is covered so as much light as possible can be blocked out
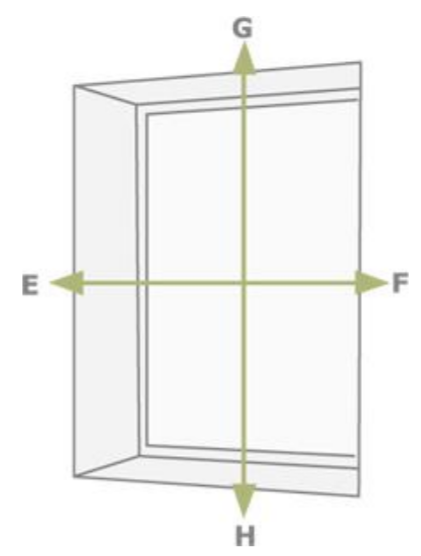
How to measure for an outer recess fitting:
1. Decide how far you want your blind to extend beyond the left and right of your window. We recommend this should be about 6.5cm to 7.5cm to minimise as much external light as possible. Then carefully measure the width between the two points – e.g. E to F.
2. For the drop, you again need to decide how high up you want your blind to start and where you want it to finish below the window. Again we recommend 6.5cm to 7.5cm on top and at the bottom to minimise as much external light as possible. Then carefully measure the drop between the two points – e.g. G to H.
Top Tips – things you should know when measuring for outer recess:
- For roller blinds please note this width includes the mechanism of the blind and is not the width of the cloth
The Basics – things you need to know when starting:
A. For accuracy and best results always try and use a metal tape measure
B. Be ready to write the measurements down immediately by having a pen/pencil and
paper to hand.
C. Label each window for clarity (e.g. kitchen, bedroom, office, board room etc)
Inner or Outer Recess?
Just like with window blinds you have two fitting options available to you depending on your requirements.
- Inner Recess - This is s where the shutters fit inside the window recess or frame.
- Outer Recess - This is s where the shutters fit outside the window recess or frame.
How to measure for an inner recess fitting
Step 1 – Check Your Recess Is Square
- First you need to check your recess is square making it suitable for our shutters to be fitted in the recess
- Measure diagonally from corner to corner on both sides, then compare both measurements

- If the difference is 12mm or less, you’re good to go. If the measurements vary by any more than 12mm, then we would recommend you choose to fit shutters ‘outside mount’, on to the internal wall.
Other things to be aware of:
- Inspect your window recesses for any potential obstructions such as handles or any inward opening windows or doors. We would recommend you use an outside mount for any inward opening windows so that your windows can still open in full and are not obstructed. Ensure the position of your shutters will not interfere with any of the above points and consider the position of your shutters when they are open, normally only done when gaining access for cleaning or ventilation.
- All our full height shutters are supplied with a four-sided frame for strength, stability and ease of installation.
- Decide where your shutters are going to sit. This can be at the front of the recess (order Z frame) or inside the recess (order L frame). Always take your measurement at the position you plan to fit your shutters. Don’t worry about making any deductions for clearance, we do that for you.
- Allow for a 50mm overlap to both your width and drop when installing outside the recess only
- Consider the opening of your folded panels for cleaning and access. Shutter panels would normally rest in the closed position with the louvres adjusted to give the desired control.
- Shutters provide great insulation and whilst not fully blackout, they offer a great deal of light control and privacy
Step 2 – Fitting at the front of your recess (Z Frame)
- For the front of recess fitting you need to measure at the front edge of the recess. Measure the width at the Top, Middle and Bottom
- Next measure the drop on the right, in the centre and on the left. Make a note of the smallest measurements taken, these are the sizes you will use later to place your order
- Now you’re ready to choose and order your favourite ‘z’ frame style. The overlap flange of the frame will cover any uneven clearance gaps between the edges of the recess and frame. This is the most forgiving method of recess fitting and would not normally require any filling of gaps with caulk or silicone filler.

Step 3 – Fitting inside the recess (L Frame)
- For an inside recess fitting, you can position your shutters anywhere you choose inside the recess, even flush against the window. Just make sure you measure far enough forward so that you avoid any obstructions such as window handles
- Mark where you are going to fit your shutters and measure both the width and the drop in 3 places, note down the smallest measurements taken, these will be used when ordering

The Basic – what you will need to fit your blinds
- Metal measuring tape and pencil
- A drill with the appropriate drill bit
- Star head screwdriver
- Wall plug
- Step ladder (if required)
- Obvious, but of course you’ll need your blind. So open the box and familiarise yourself with the contents
Step 1 – Positioning the brackets – Decide how you want to mount the blinds on/in the window
- Top Mount – also known as top fixing is where you fix the brackets to the top of the window recess or ceiling
- Face Mount – also known as face fixing is where you fix the brackets either onto the window frame or on the wall


- Always make sure you position the brackets to allow free operation of the blind e.g. where it will not come into contact with door handles or any other obstacles.

- For a top mount, measure and mark the distance (D) – the distance in the recess but away from any obstructions
- Hold each bracket into place and mark the hole position with a pencil. This is where you will drill your holes

- For a face mount, hold each bracket into place and mark the hole positions.
- Fit each bracket with suitable screws. Please ensure fixings are suitable for the wall/surface to which you are mounting the brackets
- Make sure the blind is going to be a) in the right place and that b) you haven’t spaced the brackets so far apart the blind won’t fit into them. I know it sounds obvious, but this is just a reminder!
Step 2 – Drilling your holes & fitting your brackets
- Grab your drill and a wall plug (if you’re drilling into masonry or plaster).
- Make sure the drill bit (the long piece of metal on the end of the drill that does the drilling) is the same size as the wall plug. If it is too big, the wall plug will fall out of the wall and if it’s too small, you’ll never be able to get the wall plug in.
- Using a firm and steady hand drill into the wall where you marked it with the pencil. Once done insert the wall plugs if you’re using them.
- Once the holes have been drilled put your brackets into place and use a screw and screw driver to secure the bracket against the face or top mount
Step 3 – Fitting the blind
- Pick up the blind (make sure it is fully wound up) and observe where the mechanism is. The mechanism is the part that operates the blind, so it’ll have a plastic or stainless steel chain depending on your order

- The end with the mechanism should be inserted into the bracket first. Once it’s in, pop the other end into its bracket too.

- Congratulations you have successfully fitted your blinds!!
Important Note!!
Young children can be strangled by loops in pull cords, chains, tapes and inner cords that operate the product. Always use a safety device to keep cords or chains out of reach of children. We provide a variety of safety devices to enable you fix the blind cord to the wall. Let us know when you’re ordering your blind if a child safety device is required.
The Basic – what you will need to fit your blinds
1. Metal measuring tape and pencil
2. A drill with the appropriate drill bit
3. Star head screwdriver
4. Wall plug
5. Step ladder (if required)
6. Obvious, but of course you’ll need your blind. So open the box and familiarise yourself with the contents
Step 1 – Positioning the brackets
· First decide if you wish to fit the blind using the face fix or top fix method. Before fitting the brackets, place the brackets up to the surface and mark the hole spaces using a pencil – this is where you will drill the holes. Please note that you may need to allow extra space to avoid any protrusions such as window handles.
· Top mount/fixing - When fitting using the top fixing method simply use the holes on the top of the bracket to screw directly up into the lintel/ceiling around 13mm away from your window. This is so the cord and back material runs smoothly away from your window, if you have handles that stick out further than this then fit further away from the window to avoid it catching
· Face mount/fixing - When fixing using the face fixing method use the holes at the back of the bracket and screw directly into your wall.
Step 2 – Fitting the blind (Top or Face mount)
· Simply place the cassette up to the bracket and once the back of the cassette is hooked into the back of the bracket, ease the cassette up until it firmly clicks into place
· Taking the blind down - To take the blind down simply push the front of the bracket and gently ease the cassette out of the bracket.
Important Note!!
Young children can be strangled by loops in pull cords, chains, tapes and inner cords that operate the product. Always use a safety device to keep cords or chains out of reach of children. We provide a variety of safety devices to enable you fix the blind cord to the wall. Let us know when you’re ordering your blind if a child safety device is required.